Chapters 1-3, 6
[ZONE 4 MAP]
![]() [CHAPTER 3]
[CHAPTER 3]
![]() [CHAPTER 6]
[CHAPTER 6]
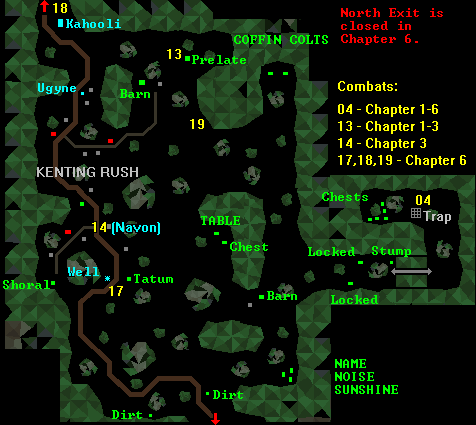
This is an Image Map. Click Green Caches, Yellow Combats, or Red Arrows.
[ZONE 4 MAP]
![]() [CHAPTER 3]
[CHAPTER 3]
![]() [CHAPTER 6]
[CHAPTER 6]
This is an Image Map. Click Green Caches, Yellow Combats, or Red Arrows.
CACHES
![]()
![]() SUNSHINE Chest (4/8)
SUNSHINE Chest (4/8)
![]()
![]() NAME Chest (4/8)
NAME Chest (4/8)
![]()
![]() NOISE Chest (5/9)
NOISE Chest (5/9)
![]()
![]() COFFIN Chest (4/8)
COFFIN Chest (4/8)
![]()
![]() COLTS Chest (5/9)
COLTS Chest (5/9)
![]()
![]()
![]() TABLE Chest (5/9)
TABLE Chest (5/9)
![]()
![]() Chest (2/6)
Chest (2/6)
![]()
![]() Locked Chest (2/6)
Locked Chest (2/6)
![]() Skill > 50 or Peasant's Key
Skill > 50 or Peasant's Key
![]()
![]() Locked Chest (2/6)
Locked Chest (2/6)
![]() Skill > 70 or Noble's Passkey
Skill > 70 or Noble's Passkey
![]()
![]() Chest 1 of 5 (3/7)
Chest 1 of 5 (3/7)
![]() Chest 2 of 5 (3/7)
Chest 2 of 5 (3/7)
![]() Chest 3 of 5 (2/6)
Chest 3 of 5 (2/6)
![]() Chest 4 of 5 (4/8)
Chest 4 of 5 (4/8)
![]() Chest 5 of 5 (1/5)
Chest 5 of 5 (1/5)
![]()
![]() House (1/1)
House (1/1)
![]()
![]() Barn (1/1)
Barn (1/1)
![]()
![]() Barn (2/2) [Chapters 1-3 / Chapter 6: Lady Boswich]
Barn (2/2) [Chapters 1-3 / Chapter 6: Lady Boswich]
![]()
![]() Dirt (1/1)
Dirt (1/1)
![]()
![]() Dirt (1/1)
Dirt (1/1)
![]()
![]() Stump (1/1)
Stump (1/1)
![]()
TRAP
The Webmaster has been known to describe this as nasty, but really
it is very, very simple, if you know the trick!
First kill the Trolls. Since they can't move, Owyn can easily
kill them by casting INVITATION! Then navigate the Trap:
The Near Solid and Transparent Crystals are obviously useless.
Ignore them. The Red Pole current can NOT be deactivated.
Push the FAR Transparent Crystal in front of the Right Blaster in order
to get rid of the Green Pole Current. Then push the Far Solid Crystal in
front of the Left Blaster. Exit.
![]()

![]() TEMPLE OF KAHOOLI
TEMPLE OF KAHOOLI
Bless Type #3 - Price: 25 + 70% of Basic Price
![]() Basic Curing Factor = 65
Basic Curing Factor = 65
![]() Teleport = YES
Teleport = YES
You can only talk to the Priest of Kahooli in Chapter 3. He can tell
you who the Leader of the Nighthawks is, but first you have to prove
yourself worthy of the cause by performing an Act of Piety. In order
to do this, you first have to visit the Prelate (East of the Temple),
in order to learn of the Codes of Piety. The only act of Piety you can
actually perform is Mortification of the Flesh - and this can only be
achieved by Starving. Store all your Rations in a Bag behind the Temple,
and sleep past the next midnight until 6:00 AM. (Midnight is feeding
time, and since you don't have any Rations, you will go into Starving
Condition. The Temple is closed during the night.) If you now re-enter
the Temple and talk to the Priest, he will tell you who the Nighthawk
Leader is, and inform you that he is now Excommunicate. If you're lucky,
your stashed Rations will still be in the Bag where you left them. If
not, it doesn't really matter because the Priests will give each Character
Rations [27] as they leave the Temple.
![]()
PRELATE'S HOUSE
 The Prelate's House is protected by Rogue Guards in all Chapters. This is
a "repeat" Combat - even if you kill them, the five Rogues will reappear.
This is quite a good place for practicing your Skills - after you've killed
them once, they will come back with their Stamina at ZERO. As you go on
killing them again and again, their Weapons and Armor will get worse and
worse as well. If you handle this cleverly, and are prepared to spend some
time here, you can easily improve your Combat and Casting Skills quite a lot
here.
The Prelate's House is protected by Rogue Guards in all Chapters. This is
a "repeat" Combat - even if you kill them, the five Rogues will reappear.
This is quite a good place for practicing your Skills - after you've killed
them once, they will come back with their Stamina at ZERO. As you go on
killing them again and again, their Weapons and Armor will get worse and
worse as well. If you handle this cleverly, and are prepared to spend some
time here, you can easily improve your Combat and Casting Skills quite a lot
here.
Only in Chapter 3 can you enter the Prelate's House, if you've talked to the Priest at the Temple of Kahooli first. The Prelate will tell you about the Codes of Piety (for a donation of 50 Gold Sovereigns). This should make you realize that you need to Starve in order to get the information you need from the Priest of Kahooli (see above).
![]()
KENTING RUSH
Kenting Rush is quite a lively little town. It is central to the Main
Quest of Chapter 3, and in Chapter 6 there's a mini-Quest to perform
here as well. Apart from the Shop, and the two Taverns, it has some
places worth visiting:
![]()
DAVID TATUM'S HOUSE
David can improve your Scouting Skill (free of charge) by 8 - 12 points,
depending on your selections.
![]()
SHORAL'S HOUSE
 You can get a Lightning Staff [30] from Shoral, if you can answer his questions
correctly. There are three questions - answer YES to the first one, NO to
the second one, and Owyn will take care of the third question! But beware:
If you make a mistake, you will lose all your Gold Sovereigns (up to a maximum
of 1000).
You can get a Lightning Staff [30] from Shoral, if you can answer his questions
correctly. There are three questions - answer YES to the first one, NO to
the second one, and Owyn will take care of the third question! But beware:
If you make a mistake, you will lose all your Gold Sovereigns (up to a maximum
of 1000).
![]()
KENTING RUSH WELL

In the Well you will find a Knight's Piece. You will need this in order
to finish
Chapter 3, so make sure you don't stash it in an unsafe place!
You won't be
able to enter Cavall Run without it.
![]()
THE DAGGER 'N STAR TAVERN
 This Tavern is quite unremarkable in Chapters 1-3, but will be
different in Chapter 6. Interestingly, a man here will offer to
carry messages to Northwarden. If you have Spynote #19 (taken
from an enemy in Combat 16, near Cavall Keep), he will promise
to deliver it. (The purpose of this eludes me, unless it's supposed
to make clear that the events of Chapter 6 coincide with those of
Chapter 5.)
This Tavern is quite unremarkable in Chapters 1-3, but will be
different in Chapter 6. Interestingly, a man here will offer to
carry messages to Northwarden. If you have Spynote #19 (taken
from an enemy in Combat 16, near Cavall Keep), he will promise
to deliver it. (The purpose of this eludes me, unless it's supposed
to make clear that the events of Chapter 6 coincide with those of
Chapter 5.)
More importantly, you can now talk to Lurough, the innkeeper. He will complain about the shortage of alcohol, and ask you to help out. You have now initiated the Alcohol Quest. If you can find an Ale Cask (one will do) and bring it back to the Tavern, Lurough will reward you handsomely with a Sword of Lims-Kragma [83].
![]()
UGYNE
 You will run into Ugyne Corvalis here in Chapter 6. If you ask
here about HER FATHER, you'll find that she has learned the sordid
truth behind the Corvalis family saga and the vile machinations of
her brother Neville/Navon. Poor lass! No wonder she seems distraught.
If you've already talked to Lurough (see above), her ALCOHOL keyword
will be activated as well, and she will direct you towards Lady Boswich's
Barn.
You will run into Ugyne Corvalis here in Chapter 6. If you ask
here about HER FATHER, you'll find that she has learned the sordid
truth behind the Corvalis family saga and the vile machinations of
her brother Neville/Navon. Poor lass! No wonder she seems distraught.
If you've already talked to Lurough (see above), her ALCOHOL keyword
will be activated as well, and she will direct you towards Lady Boswich's
Barn.
![]()
LADY BOSWICH'S BARN
In Chapters 1-3 this is just an ordinary Barn containing a couple
of trinkets. In Chapter 6 you will find the stern Lady Boswich here.
(Count Corvalis is with her, but obviously not in command.) The Lady's
Barn is heavily guarded, and you will have to bribe the guards before
they allow you to enter. This will cost you 50 Gold Sovereigns. The
Lady will tell you about her secret wine reserves, and how to reach
them through an illusionary mountain, created by a quaint little magician
named Patrus!
![]()
NAVON DU SANDAU
 Navon, Ugyne's suitor, is the Leader of the Nighthawks, and will be found
near the abandoned inn in Kenting Rush in Chapters 1 and 3. In order to
finish Chapter 3 you must unmask him and kill him, but you can only do so in this
Chapter. By the time you reach him in Chapter 3, you will have uncovered many clues
pointing towards the fact that he is responsible for the Black Sheep Tavern murders,
one of which is the strong smell of jasmine which seems to accompany him wherever he
goes (Jason, Haphra).
Navon, Ugyne's suitor, is the Leader of the Nighthawks, and will be found
near the abandoned inn in Kenting Rush in Chapters 1 and 3. In order to
finish Chapter 3 you must unmask him and kill him, but you can only do so in this
Chapter. By the time you reach him in Chapter 3, you will have uncovered many clues
pointing towards the fact that he is responsible for the Black Sheep Tavern murders,
one of which is the strong smell of jasmine which seems to accompany him wherever he
goes (Jason, Haphra).
CHAPTER 1 If you've visited Count Corvalis in this Chapter, you can ask Navon about him. If you've been to Malac's Cross and discussed CHESS with Ivan Skaald, Navon will teach you Sandau's Retreat (for 100 Gold Sovereigns), a chess move which will leave Ivan helpless. CHAPTER 2 Navon is absent, presumably busy murdering Kingdom soldiers in Romney.
CHAPTER 3 In this Chapter you can learn the final secrets of the Corvalis family saga. You also need to unmask Navon as the Leader of the Nighthawks, kill him and get his Cellar Key, in order to be able to finish Chapter 3.
There are two ways to unmask Navon, the way of RELIGION and the way of KNOWLEDGE. The first is simpler and only involves the Priest and the Prelate of Kahooli (see above). If you have talked to Kahooli's priest, you can ask Navon about KAHOOLI. If you've performed the Starvation ritual (see above under Kahooli and Prelate), Navon's EXCOMMUNICATE keyword will turn on. You can now unmask him, and fight him.
 The second way is rather more complex, and involves quite a bit of travel, but
is actually much more interesting. If you've gained all possible information from
Count Corvalis and his daughter (see Cavall Keep sector), more of Navon's keywords
will become available.
In addition to COUNT CORVALIS, you can now ask him about HIS NAME and THE ACCIDENT.
But this is not quite enough! In order to reveal Navon's last keyword, SWORD, you
will need to enter Cavall Run (see) and find the Abbot's Journal, which Ugyne lent to
Navon. This will do the trick: If you have asked Ugyne about the SWORD, and have
the Abbot's Journal, you can finally ask Navon about the SWORD. He will now reveal
his true colours, and you will be able to fight him.
The second way is rather more complex, and involves quite a bit of travel, but
is actually much more interesting. If you've gained all possible information from
Count Corvalis and his daughter (see Cavall Keep sector), more of Navon's keywords
will become available.
In addition to COUNT CORVALIS, you can now ask him about HIS NAME and THE ACCIDENT.
But this is not quite enough! In order to reveal Navon's last keyword, SWORD, you
will need to enter Cavall Run (see) and find the Abbot's Journal, which Ugyne lent to
Navon. This will do the trick: If you have asked Ugyne about the SWORD, and have
the Abbot's Journal, you can finally ask Navon about the SWORD. He will now reveal
his true colours, and you will be able to fight him.
In case you can make neither head nor tail of the Corvalis saga, or if you are just somewhat vague about some aspects of it, here's a simple guide. If you want details, you'll just have to go back to the game.
Navon is really Neville, Ugyne's half-brother. Neville is not the Count's son.
The original Cavall Keep used to be situated above Cavall Run. Cavall Run used
to be the Keep's cellars, where Ugyne and her brother loved to roam when they were
children. Cavall Keep has been destroyed in a fire, and the Count has moved to
the present Cavall Keep. Cavall Run is now a hangout for Nighthawks and other nasties.
When Count Corvalis realized that his wife had cheated on him, and that Neville
wasn't his son, he decided to kill Neville. He rigged the wine cellar to collapse,
and sent Neville down there to fetch a bottle. Miraculously Neville survived,
stole the Spyglass, and got taken up by the Nighthawks. He assumed the name of
Navon Du Sandau. (Du Sandau was the name of a drunken architect held responsible
for the collapse of the wine cellar.) Navon grew up to become a Leader of the
Nighthawks. His first act of revenge was the destruction of Cavall Keep. Recently
he has been courting Ugyne, hoping to marry her, thus finalizing his revenge.
![]()
COMBATS
This is a rough table of all Enemies in this sector of Zone 4. For more
detailed information click on the Combat Number in the map above, or in the
table below.
| Combat # 04 ( Trap in Secret Valley ) |
Zone
4
|
|||||||||||
| TR | 013 | 0601 | 00 | 59 | 51 | 00 | 34 | 65 | 56 | 80 | 00 | |
| TR | 014 | 0101 | 00 | 50 | 67 | 00 | 29 | 67 | 50 | 83 | 00 | 50.00 |
| Combat # 13 ( Prelate's House ) |
Zone
4
|
|||||||||||
| RG | 048 | 0105 | 06 | 20 | 16 | 04 | 17 | 52 | 38 | 46 | 00 | SKA94 BSW67 FRO04 00.28 |
| RG | 049 | 0306 | 06 | 22 | 32 | 04 | 14 | 33 | 49 | 44 | 00 | SKA57 BSW84 |
| RG | 050 | 0407 | 05 | 25 | 17 | 03 | 19 | 49 | 39 | 54 | 00 | SKA87 BSW93 WHT04 LEW01 00.43 |
| RG | 051 | 0506 | 04 | 27 | 17 | 03 | 16 | 56 | 34 | 57 | 00 | SKA79 BSW57 |
| RG | 052 | 0604 | 04 | 26 | 24 | 05 | 18 | 52 | 32 | 65 | 00 | SKA75 BSW59 HAM02 00.27 |
| Combat # 14 ( Nr Abandoned Inn in Kenting Rush ) |
Zone
4
|
|||||||||||
| NV | 053 | 0408 | 00 | 70 | 60 | 06 | 35 | 85 | 75 | 80 | 00 | DPA90 GSW92 TLC85 QEN12 SLV08 FRO04 CEK01 NOT30 DIA80 98.00 |
| Combat # 17 ( Kenting Rush Well ) |
Zone
4
|
|||||||||||
| RG | 064 | 0103 | 05 | 27 | 16 | 04 | 15 | 60 | 43 | 55 | 00 | SKA88 RAP82 |
| RG | 065 | 0306 | 05 | 33 | 35 | 04 | 14 | 33 | 38 | 48 | 00 | SKA96 2HB97 HAM04 16.00 |
| RA | 066 | 0606 | 04 | 29 | 27 | 03 | 15 | 53 | 48 | 54 | 00 | EAR48 2HB98 TLC75 QUP15 22.00 |
| Combat # 18 ( North of Kahooli ) |
Zone
4
|
|||||||||||
| RG | 067 | 0006 | 05 | 37 | 19 | 03 | 14 | 37 | 44 | 57 | 00 | SKA80 KIN83 RUB31 |
| RG | 068 | 0104 | 04 | 31 | 19 | 03 | 17 | 47 | 32 | 54 | 00 | SKA90 GOB78 RTT10 GPK01 RES02 13.00 |
| RG | 069 | 0208 | 04 | 27 | 20 | 03 | 17 | 41 | 47 | 65 | 00 | SKA80 2HB72 11.00 |
| RG | 070 | 0306 | 05 | 32 | 16 | 04 | 14 | 45 | 48 | 49 | 00 | SKA81 2HB89 |
| RA | 071 | 0506 | 06 | 40 | 15 | 05 | 20 | 52 | 43 | 49 | 00 | SKA98 2HB74 MCR70 QUP10 PEK01 RED04 |
| RG | 072 | 0704 | 06 | 29 | 27 | 05 | 19 | 43 | 30 | 47 | 00 | SKA94 2HB88 PIC01 33.00 |
| Combat # 19 ( South of Prelate's House ) |
Zone
4
|
|||||||||||
| RG | 073 | 0104 | 04 | 27 | 24 | 03 | 20 | 56 | 37 | 51 | 00 | DPA77 2HB89 |
| RA | 074 | 0207 | 05 | 22 | 15 | 04 | 18 | 34 | 42 | 49 | 00 | EAR78 GOB90 TLC97 QUP07 |
| RA | 075 | 0406 | 05 | 37 | 16 | 03 | 14 | 42 | 35 | 42 | 00 | EAR85 RAP82 TLC74 QEA11 RTT02 BRO84 RES02 |
| RG | 076 | 0606 | 06 | 37 | 19 | 04 | 17 | 37 | 41 | 53 | 00 | SKA92 2HB97 PEK01 LEW03 15.00 |