Chapters 1-3, 6
[ZONE 4 MAP]
![]() [CHAPTER 3]
[CHAPTER 3]
![]() [CHAPTER 6]
[CHAPTER 6]
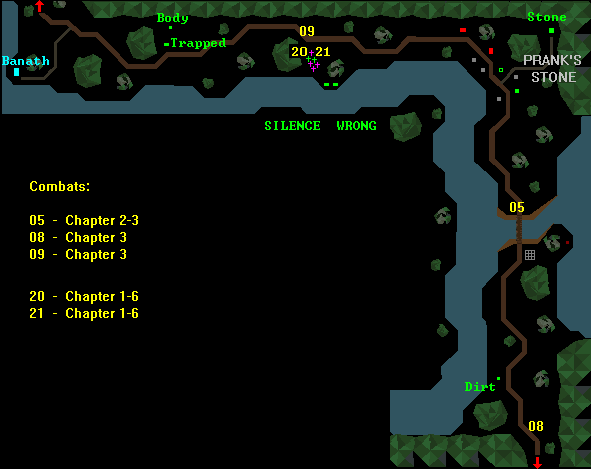
This is an Image Map. Click Green Caches, Yellow Combats, or Red Arrows.
[ZONE 4 MAP]
![]() [CHAPTER 3]
[CHAPTER 3]
![]() [CHAPTER 6]
[CHAPTER 6]
This is an Image Map. Click Green Caches, Yellow Combats, or Red Arrows.
CACHES
![]()
![]() SILENCE Chest (2/6)
SILENCE Chest (2/6)
![]()
![]() WRONG Chest (4/8)
WRONG Chest (4/8)
![]()
![]() Trapped Chest (4/8)
Trapped Chest (4/8)
![]() Skill > 44
- Damage: 150
Skill > 44
- Damage: 150
![]()
![]() Dirt (2/2)
Dirt (2/2)
![]()
![]() Grave: Jason Verchew (1/1)
Grave: Jason Verchew (1/1)
![]() Grave: Corey Perlance (1/1)
Grave: Corey Perlance (1/1)
![]()
![]() Body (2/4)
Body (2/4)
![]()
![]()
Near the river bank South-East of the Prank's Stone
Bridge you can find Silverthorn [1]
in Chapters 2, 3 and 6, but only
if your Scouting Skill is 50% or more.
![]()
TRAP
Push Transparent Crystal in front of Left Blaster, thus deactivating
the Pole Current. Step between Poles and go OUT. The Far Pole will
shield you from the Left Blaster. (Note: the Right Blaster is irrelevant,
unless you stupidly step in front of it.)
![]()

![]() TEMPLE OF BANATH
TEMPLE OF BANATH
Bless Type #2 - Price: 40 + 90% of Basic Price
![]() Basic Curing Factor = 80
Basic Curing Factor = 80
![]() Teleport = YES
Teleport = YES
Outside the Temple two Rogues demand that you "strip off all metals".
Ignore them (since they can't be fought). They're just trying to
fool you. Banath is, after all, a God of Thieves.
It should be noted that the Shop here, ROOTS & HERBS, differs drastically
between versions. In Version 1.01 it is horribly expensive (3.51), which
means you can sell GEMS here at outrageous prices! In Version 1.02 it's
just another Shop (1.00). This is a shame, really. In Version 1.01 it was
possible (and fun) to make lots of cash by teleporting to Banath and selling
Gems in this Shop.
At the Inn, THE FLYING SOW, a Woman will give you Rope [4] for no apparent
reason. A Man will give you a valuable clue (Temple of Kahooli).
![]()
PRANK'S STONE
Not important in the grand scheme, Prank's Stone is a "funny"
little town. The inhabitants are a bit weird, and ... say no more.
![]()
THE STONE
 If you follow the North-East path in Prank's Stone, you will end up
near the STONE. Don't touch it!
The result of touching the Stone varies between Versions:
If you follow the North-East path in Prank's Stone, you will end up
near the STONE. Don't touch it!
The result of touching the Stone varies between Versions:
Ver 1.01 - You lose 100 Gold Sovereigns, and all Peasant's Keys,
Guilder's Passkeys, Noble's Passkeys, Guildis Thorns AND Virtue
Keys.
Ver 1.02 - You lose NO money and NO Virtue Keys, but all Peasant's Keys,
Guilder's Passkeys, Noble's Passkeys and Guildis Thorns.
![]()
INVENTOR'S HOUSE

The Inventor can turn your Rubies into 2% Diamonds. Since a 2% Diamond is
equivalent to an 8% Ruby, this is hardly feasible, unless you can cook
up a devious scheme ...
![]()
ACTOR'S HOUSE
You stupidly break down the door, only to find out that it will
cost you
25 Gold Sovereigns. So don't do it!
![]()
COMBATS
This is a rough table of all Enemies in this sector of Zone 4. For more
detailed information click on the Combat Number in the map above, or in the
table below.
| Combat # 05 ( North of Prank's Bridge ) |
Zone
4
|
|||||||||||
| RG | 015 | 0104 | 05 | 23 | 27 | 04 | 20 | 37 | 40 | 42 | 00 | SKA78 BSW57 19.00 |
| RA | 016 | 0305 | 05 | 35 | 24 | 04 | 13 | 31 | 33 | 65 | 00 | SKA65 LAM92 TLC85 QUA18 00.33 |
| RG | 017 | 0404 | 05 | 20 | 25 | 04 | 15 | 55 | 50 | 43 | 00 | SKA70 BSW66 RTT07 PEK01 19.00 |
| RG | 018 | 0606 | 06 | 38 | 30 | 05 | 18 | 59 | 49 | 57 | 00 | SKA87 BSW96 WHT06 |
| Combat # 08 ( South of Prank's Bridge ) |
Zone
4
|
|||||||||||
| NA | 026 | 0104 | 05 | 48 | 32 | 03 | 24 | 48 | 49 | 58 | 00 | SKA67 LAM67 LCR50 QUA09 GPK01 |
| NA | 027 | 0404 | 06 | 48 | 28 | 05 | 25 | 36 | 38 | 58 | 00 | SKA66 BSW65 MCR74 QUA08 RPP06 RES01 |
| NA | 028 | 0605 | 07 | 32 | 40 | 05 | 21 | 39 | 39 | 61 | 00 | SKA65 BSW50 TLC73 QUA19 WHT10 SLV02 |
| Combat # 09 ( West of Prank's Stone ) |
Zone
4
|
|||||||||||
| NA | 029 | 0006 | 06 | 38 | 33 | 03 | 24 | 54 | 47 | 65 | 00 | SKA95 BSW63 LCR62 QUA13 NOX02 |
| NA | 030 | 0306 | 05 | 47 | 40 | 04 | 15 | 41 | 35 | 62 | 00 | SKA59 LAM90 LCR65 QUP07 |
| NH | 031 | 0606 | 06 | 26 | 20 | 03 | 27 | 42 | 37 | 62 | 00 | SKA72 BSW62 WHT08 DAL01 00.43 |
| NA | 032 | 0504 | 07 | 49 | 22 | 05 | 17 | 47 | 36 | 61 | 00 | SKA65 BSW84 LCR54 QUP07 PEK01 |
| Combat # 20 ( Prank's Grave (Lincoln Abervant) ) |
Zone
4
|
|||||||||||
| SH | 077 | 0405 | 00 | 42 | 34 | 03 | 23 | 67 | 37 | 00 | 00 | SKA73 LAM72 |
| Combat # 21 ( Prank's Grave (Damon Boyersmith) ) |
Zone
4
|
|||||||||||
| SH | 078 | 0504 | 00 | 50 | 23 | 03 | 22 | 61 | 46 | 00 | 00 | SKA88 LAM86 |